JS原型链与补环境
原型
__proto__:在 js 中,每个实例对象都拥有__proto__(隐式原型),实例的__proto__.constructor指明该实例创建时使用的构造方法 。如下所示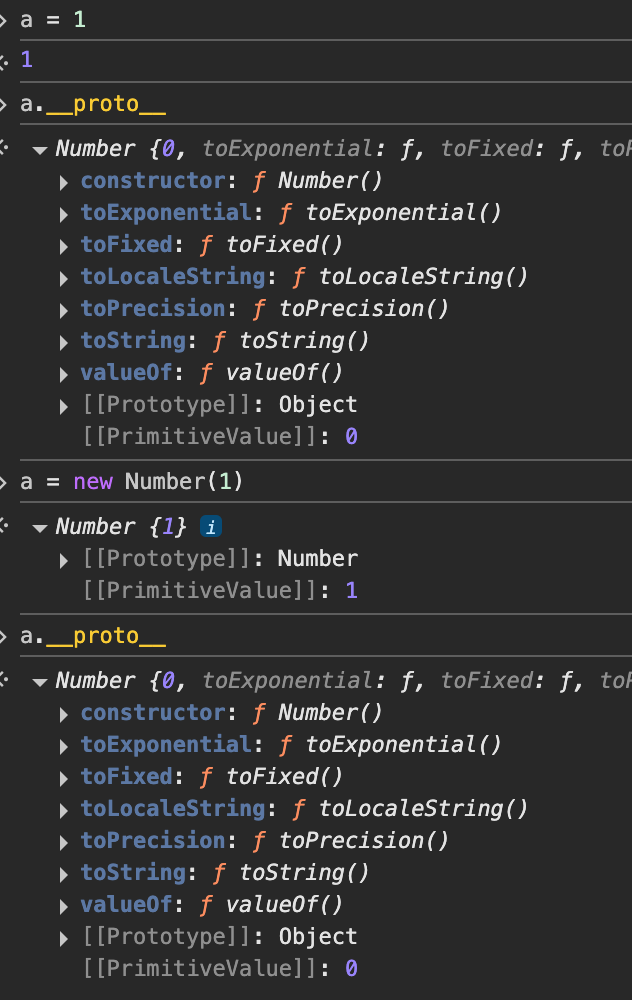
prototype: 函数除了拥有__proto__,还额外拥有prototype(显示原型)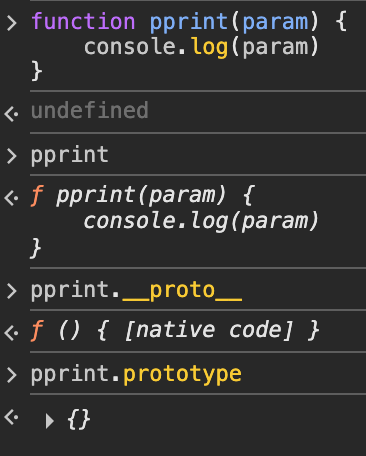
构造方法与原型链
在了解原型链前,先了解js中的构造方法。构造方法也是函数,因此也拥有 prototype。构造函数首字母通常大写,表示可以用 new 创建实例
构造函数与原型
下面介绍两种构造函数编写方式
传统方式
function Person(name) {
    this.name = name;
    this.introduce = function() {
        console.log(`Hi, I'm ${this.name}`);
    };
}
效果如下。使用该方法
new出来的对象,其__proto__.constructor指向构造函数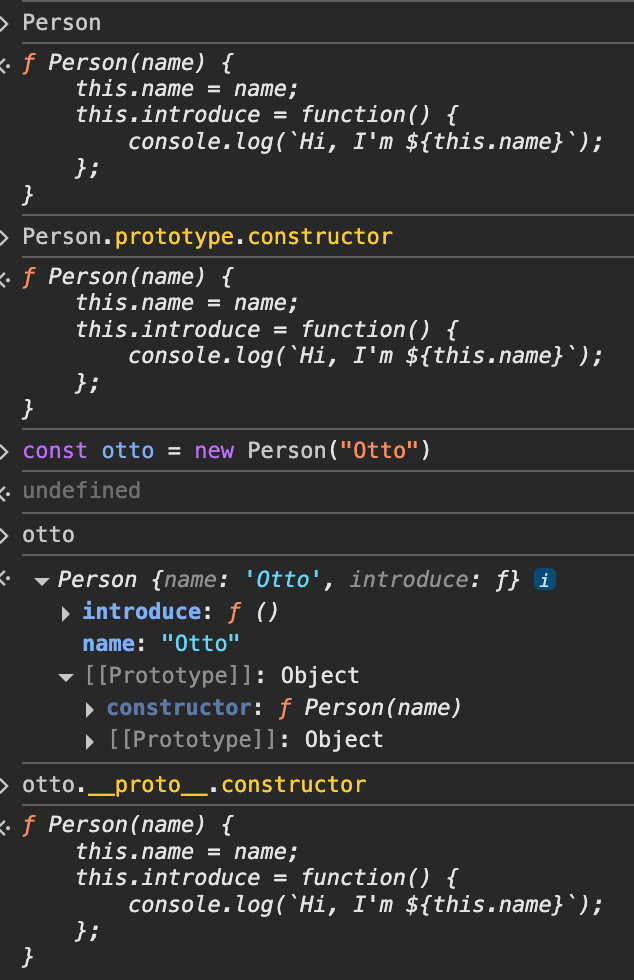
通过以上例子,可以得到如下结论(Tips:(助记)实例通常用到
__proto__,构造方法通常用到prototype。prototype是构造方法自身的,__proto__则是父级的prototype)重点1:实例的
__proto__指向构造函数的prototypeotto.__proto__ === Person.prototype重点2:实例的
__proto__.constructor与 构造函数的prototype.constructor指向构造函数自己,即obj.constructor用于获取其构造函数otto.__proto__.constructor === Person.protype.constructor === Person重点3:构造函数的
prototype.__proto__指向父类的prototypePerson.prototype.__proto__ === Object.prototypethis方式绑定的方法为实例私有,实例自己修改后不会影响其他实例,可理解为实例方法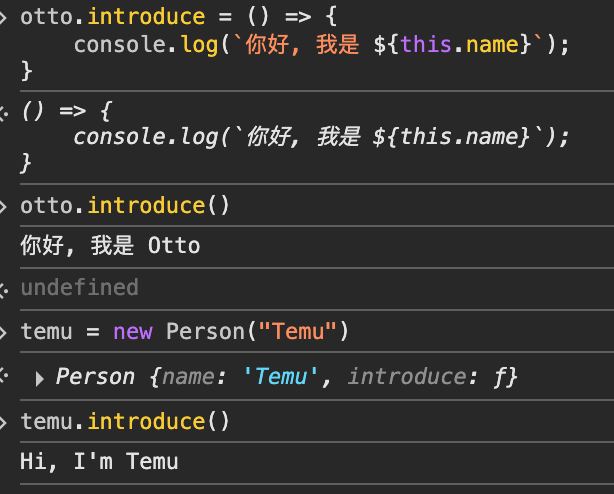
重点4:绑定在构造方法的
prototype内的方法是其所有实例共享的,实例可调用该方法。且在该方法修改时,实例调用也会对应变动。可理解为随动的类方法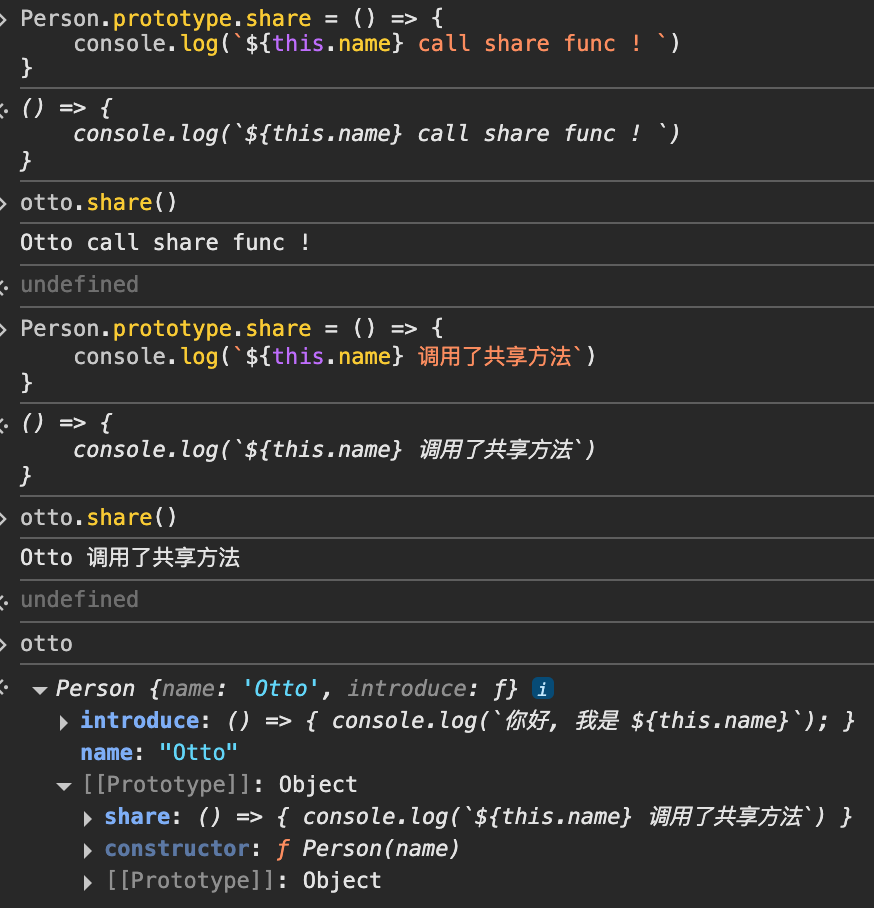
class方式(ES6引入)。代码来自MDN
class Person {
    constructor(name) {
        this.name = name;
    }

    introduce() {
        console.log(`你好,我的名字是 ${this.name}`);
    }
}

const otto = new Person("Otto");

otto.introduce(); // 你好,我的名字是 Otto
效果如下。此时
class中声明的方法,都会绑定到构造方法的prototype中,即所有实例共享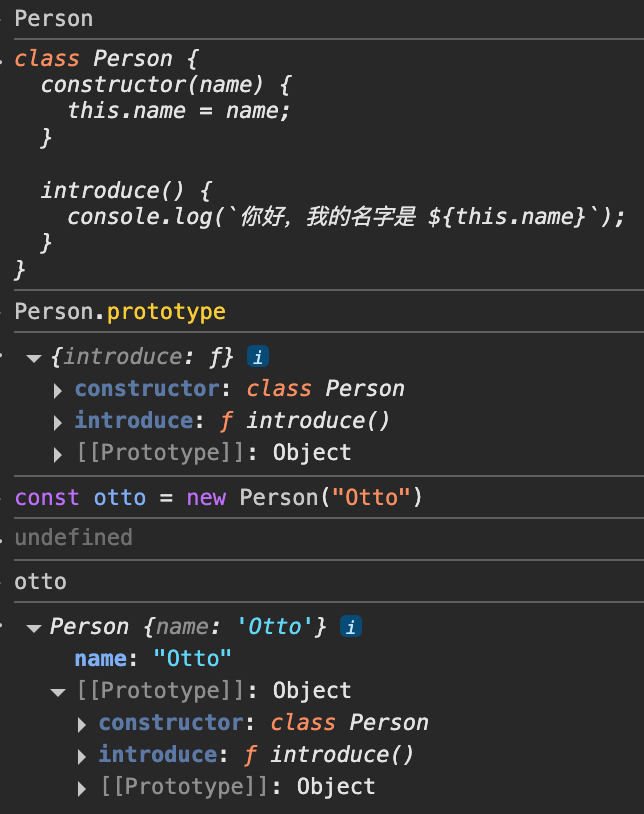
Tips:
函数的构造函数是 Function,构造函数也是如此。即 fn.__proto__.constructor === Function
在调试时,如果某个对象是某个构造函数的实例,通过搜索 obj= 定位该对象的实例化位置,从而定位构造函数
instanceof 的本质是检测构造函数的 prototype 是否出现在对象的原型链上
原型链
当访问一个对象的属性或方法时,会沿着自身的 __proto__ (隐式原型,即构造函数的 prototype) ,构造函数原型的 __proto__ (即,父类的 prototype),依次往上,直到顶层的 Object.prototype.__proto__(即 null)为止。找到时返回,未找到时返回 undefined
这种由 __proto__ 属性将对象层层串联起来的链式结构(obj.__proto__.__proto__.__proto__....,类的显示原型、父类的显示原型、祖父类的显示原型...),就被称为原型链。
构造函数的 __proto__ 指向 Function.prototype,即 Person.__proto__ === Function.prototype
该文章可加深理解 MDN 继承与原型链
构造函数的继承
需要声明某个子类时,需按照以下流程
- 明确其父类并声明
- 声明子类(自身)并设置继承关系
- 保证子类原型指向与构造函数指向
注意以下两点
- 在新建一个构造方法时,其
prototype.constructor默认指向自己,即之前提到的重点2默认是成立的 - 若需要多个构造方法,其中存在继承关系,则需要保证
<子类>.prototype.__proto__ === <父类>.prototype。采用传统方式需要手动处理,而在处理原型指向后,会影响到重点2构造函数的指向,也需对构造方法指向手动处理
下面以浏览器中 Element -> HTMLElement -> HTMLHtmlElement / HTMLDivElement / ... (html标签) 的继承关系为例( Tips:通过重点2查看父类, getParent = (cls) => {return cls.prototype.__proto__.constructor} )
传统方式
创建父类
ElementElement = function Element() {} // `Element = ` 是利用全局变量自动绑定到全局的特性 // 在补环境时,`window = global; delete global;` // 这样声明 Element,会实现 window.Element创建子类
HTMLElement继承自父类ElementHTMLElement = function HTMLElement() { Element.call(this) // 继承逻辑,调用父类构造函数。 }设置原型链中的指向关系。如果不进行此步骤。
HTMLElement的原型链将指向Object,构造方法依然指向自己// 方法一 // 设置子类原型指向,以实现 HTMLElement.prototype.__proto__ === Element.prototype // Object.create 方法,以传入为原型创建空对象,类似 {__proto__: <传入对象>} // 导致 HTMLHtmlElement.prototype.constructor 丢失 // 访问时会访问原型链上的 constructor,即 HTMLHtmlElement.prototype.__proto__.constructor。此时为父类的 constructor HTMLHtmlElement.prototype = Object.create(HTMLElement.prototype) // 因此需要手动添加当前构造方法的 constructor 属性 HTMLHtmlElement.prototype.constructor = HTMLHtmlElement // 方法二 同时保证子类原型指向与构造函数指向的设置方法 HTMLElement.prototype = Object.create(Element.prototype, { constructor: { value: HTMLElement, enumerable: false, writable: true, configurable: true, }, }); // 方法三 此函数设置原型指向不影响构造函数指向。性能略逊于 Object.create // setPrototypeOf 方法 设置传入对象的.__proto__ Object.setPrototypeOf(HTMLElement.prototype, Element.prototype)
class方式,自动实现了原型指向问题,无需额外设置
class Element {
    constructor () {
    }
}
window.Element = Element  // 需要手动绑定到 window 上,不然 window.Element 会 undefined
class HTMLElement extends Element {  // 声明父类
    constructor () {
        super()  // 使用父类构造方法
    }
}
window.HTMLElement = Element

// 检测
console.log(HTMLElement.prototype.__proto__ === Object.prototype)  // 应该为false
console.log(HTMLElement.prototype.__proto__ === Element.prototype)  // 应该为true
console.log(HTMLElement.prototype.constructor === HTMLElement)  // 应该为true
console.log(window.Element)  // 不应该为undefined
console.log(Element.toString())  // 当前输出 es6 class 模式。需要输出 function native code,可使用toString检测函数处理 safeFunction(Element)来过检测
常见浏览器内置的继承关系
Object
├── EventTarget
│     ├── Node
│     │    ├── Document
│     │    │     └── HTMLDocument
│     │    ├── DocumentFragment
│     │    ├── Element
│     │    │     ├── HTMLElement
│     │    │     │     ├── HTMLHtmlElement
│     │    │     │     ├── HTMLCanvasElement
│     │    │     │     └── ...(html标签)
│     │    │     └── SVGElement
│     │    ├── CharacterData
│     │    │     ├── Text
│     │    │     └── Comment
│     │    └── ...
│     ├── XMLHttpRequestEventTarget
│     │    └── XMLHttpRequest
│     ├── Window
│     ├── Screen (window.screen)
│     ├── Performance
│     ├── Clipboard
│     ├── MediaDevices
│     └── ...
│
├── Navigator (window.navigator)
├── History (window.history)
├── Location (window.location)
├── Storage (localStorage / sessionStorage)
├── Crypto
├── AbortController
└── ...
原型链检测
常规补环境。常常使用以下代码进行,其中
userAgent是navigator的属性,相当于构造方法中通过this绑定到实例上的实例私有属性navigator = {} navigator.userAgent = 'Mozilla/5.0 (Macintosh; Intel Mac OS X 10_15_7) AppleWebKit/537.36 (KHTML, like Gecko) Chrome/116.0.0.0 Safari/537.36'
自有属性检测函数
自有属性检测函数,用于检测对象的属性是绑定在自己身上的(原型链上的不满足)。如 hasOwnProperty getOwnPropertyDescriptor
例如: 浏览器环境中,navigator 是通过 Navigator 构造方法 new 出来的实例,而 userAgent 是 Navigator.prototype 内的属性,对于 navigator 实例来说是共享属性。以下检测代码会无法通过
// 浏览器环境应该为false,userAgent 不是 navigator 实例的私有属性。而是原型链上的属性(构造方法上的属性)
if (navigator.hasOwnProperty('userAgent')){
    console.log('invalid')
} else {
    console.log('pass')  // undefined 才通过检测
}

// 检测是否有属性描述符。原型链上的属性没有描述符
if (Object.getOwnPropertyDescriptor(navigator, 'userAgent')) {
    console.log('invalid')
} else {
    console.log('pass')  // undefined 才通过检测
}
原型链检测的补环境方法
使用构造方法
// 1. 编写构造函数
Navigator = function () {
}
// 2. 原型链属性补充
Navigator.prototype = {
    userAgent: 'Mozilla/5.0 (Macintosh; Intel Mac OS X 10_15_7) AppleWebKit/537.36 (KHTML, like Gecko) Chrome/116.0.0.0 Safari/537.36'
}
// 3. 实例化
navigator = new Navigator()
// 4. 绑定window。Tips: 在浏览器中,所有定义的全局内容,都是window的属性
window.Navigator = Navigator

// eg: 在浏览器中查看原型 如 document.documentElement.__proto__,指向了HTMLHtmlElement
// 而 HTMLHtmlElement 继承自 HTMLElement ,HTMLElement 继承自 Element
window.Element = function Element() {}
window.HTMLElement = function HTMLElement() {
    Element.call(this)
}
HTMLElement.prototype = Object.create(Element.prototype)  // 设置子类原型指向,以实现 HTMLElement.prototype.__proto__ === Element.prototype。
HTMLElement.prototype.constructor = HTMLElement  // 保证构造函数指向自己。由于原型通过父类创
window.HTMLHtmlElement = function HTMLHtmlElement() {
    HTMLElement.call(this)
}
HTMLHtmlElement.prototype = Object.create(HTMLElement.prototype)
HTMLHtmlElement.prototype.constructor = HTMLHtmlElement
利用 实例的
__proto__指向构造函数的prototype的特性var window = {} var navigator = {} navigator.__proto__ = { userAgent: 'Mozilla/5.0 (Macintosh; Intel Mac OS X 10_15_7) AppleWebKit/537.36 (KHTML, like Gecko) Chrome/116.0.0.0 Safari/537.36' }
浏览器指纹
浏览器内置API 种类繁多,常常检测部分内容是否符合浏览器特征。其中,最常检测的是宿主对象(浏览器提供的对象,如 window navigator document 等)的属性,方法等。
补环境时涉及到具体内容查看此处提供的文档
- window: 全局对象,脚本正在运行的窗口。无法被重写
delete window返回 false 删除失败window = documentwindow 依然还是全局对象
- document: 文档。如检测
document.defaultView === window - navigator
- location
- screen
- history
- 全局指向 this。
this指向全局时,为全局对象windowconsole.log(this) win - ...
与 nodejs 的明显差异
- global: 全局对象
- 可被重写
window = global
delete global
console.log(window)
d = {}
window = d
console.log(window)
- 可被重写
- Buffer
- require: 可以使用 try eval require 代码,将正常逻辑放入 catch。因为浏览器没有该导包方式
- 全局指向 this。
this指向全局时,为module.exports(该js文件导出的内容),而不是globalconsole.log(this) // 在文件无导出时 this 是空对象 window = this window.a = 1 console.log(a) // 会报错,window = global 才不会报错 - ...
Tips: dom 相关内容,如 canvas,节点操作 等,补环境难度较大,优先弄懂源码意图并替换
补环境
使用代理明确检测内容
通过代理的方式,在控制台打印出代码读取了目标对象的哪些属性。以下代理代码来源
- 环境代理:将浏览器内置对象进行代理,查看内置对象的调用情况
let setProxyArr = function (proxyObjArr) { // 环境代理 for (let i = 0; i < proxyObjArr.length; i++) { const handler = `{ get: function(target, property, receiver) { console.log("方法:", "get", "对象:", "${proxyObjArr[i]}", "属性:", property, "属性类型:", typeof property, "属性值:", target[property], "属性值类型:", typeof target[property]); return target[property]; }, set: function(target, property, value, receiver) { console.log("方法:", "set", "对象:", "${proxyObjArr[i]}", "属性:", property, "属性类型:", typeof property, "属性值:", value, "属性值类型:", typeof target[property]); return Reflect.set(...arguments); } }`; eval(`try{ ${proxyObjArr[i]}; ${proxyObjArr[i]} = new Proxy(${proxyObjArr[i]}, ${handler}); } catch (e) { ${proxyObjArr[i]} = {}; ${proxyObjArr[i]} = new Proxy(${proxyObjArr[i]}, ${handler}); }`); } } proxyArray = ['window', 'document', 'location', 'navigator', 'history', 'screen']; // ['window','document','location', 'navigator', 'history', 'screen','span', 'div','chrome','SCRIPT', 'canvas','HEAD','body','EventTarget','navigator.mimeTypes','catvm.memory.PluginArray._','localStorage','sessionStorage']; window = global; delete global; delete Buffer; // 需要先补这些对象,再对这些对象挂代理 setProxyArr(proxyArray); - 通用代理。若发现检测我们补充内容的属性时,可以代理我们补充内容,打印调用该对象的内容,并执行原本的内容
function watch(object) {  // 通用代理,当检测补充内容的属性值,用于对补充内容进行代理
    const handler = {
        get: function (target, property, receiver) {
            if (property !== 'isNaN' && property !== 'encodeURI' && property !== 'Uint8Array' && property !== 'undefined' && property !== 'JSON') {
                console.log('方法:', 'get', '对象:', target, '属性:', property,
                '属性类型:', typeof property, '属性值:', target[property], '属性值类型:', typeof target[property]);
            }
            return target[property]
            // return Reflect.get(...arguments)
        },
        set: function (target, property, value, receiver) {
            console.log('方法:', 'set', '对象', target, '属性:', property,
            '属性类型:', typeof property, '属性值:', value, '属性值类型:', typeof target[property]);
            return Reflect.set(...arguments)
        }
    }
    return new Proxy(object, handler)
}
常规处理流程
补充基本环境。如
window,document,navigator等浏览器内置对象window = global; delete Buffer; // nodejs自带关键字,删除防止检测 delete global; // 防止检测 window.parent = window.self = window.top = window.window = window; // 窗口检测,是否存在 iframe 等窗口嵌套挂代理。将基本环境与环境代理放在目标代码前,或放入 env.js 一个js文件中,使用
require("./env.js")加载目标代码。在补环境后放,可通过
require("./vmp.js")的方式,将vmp自执行函数运行,方便过格式化检测。在require后,调用vmp中的加密函数运行代码,查看控制台是否log出检测内容。如果没有,打断点后,在控制台输入
window,查看window对象是否有代理。如果window已有代理,可能通过<alias> = winodow;的别名方式对window调用与检测,搜索global、self、this、env等可能的别名,查看是否有类似别名。将其全局替换为window后查看控制台是否正常log运行代码,查看是否异常中断。通常需要补环境使代码可以顺利执行完成

注意:不是所有的异常都需要处理。 通过勾选以下内容明确原本代码中是否抛出该异常。如出现读取
buffer内的属性产生的异常,实际上是检测buffer,在浏览器中也存在该异常,则无需处理,保持与浏览器一致即可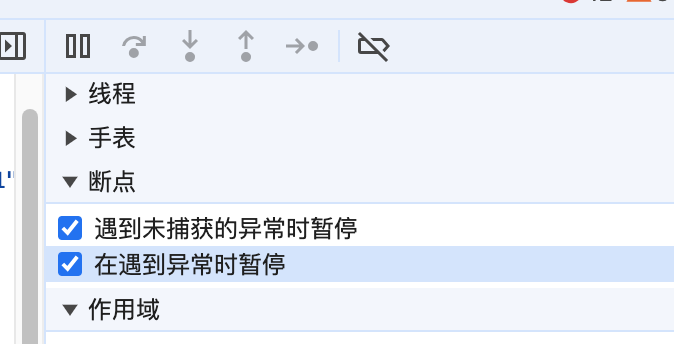
补充环境。查看调用的 undefined 内容,配合浏览器查看调用内容类型(方法还是属性,是什么类型的属性)。不是每个调用都需要补充,如检测自动化、爬虫框架的特征,配合浏览器环境,此时理应需要结果是
undefined常见的待补充内容如下
- 方法
document.createElement - 属性
document.documentElement - 方法
window/document.addEventListener - 方法
window.MouseEvent - 属性
navigator.webdriver = false
- 方法
普通补环境方法。此处以
document.documentElement为例document = { "createElement": function(e){ console.log("document createElement ",e) // 通过打印确定调用内容 } }原型链补环境。补充到原型(构造函数prototype)中,详见原型链部分
补属性。绑定到构造函数的原型上使其成为属性。需要先检查属性是否为实例,则声明该实例的构造函数后,使用构造函数实例化,再。此处以
document.documentElement为例function HTMLDocument() {} document = new HTMLDocument() // 待绑定对象 function HTMLHtmlDocument(){} // 目标属性的构造函数 HTMLDocument.prototype.documentElement = new HTMLHtmlDocument() // 绑定到待绑定类的原型上 // Tips: // 严格情况下,需要考虑继承关系,HTMLDocument -> HTMLHtmlDocument // 常用继承关系与构造函数继承方法,可查看原型链部分补方法。在对象的构造函数原型上创建该方法。此处以
document.addEventListener为例function HTMLDocument() {} document = new HTMLDocument() // 待绑定对象 // 绑定到待绑定类的原型上 HTMLDocument.prototype.addEventListener = function addEventListener(){}
对被调用对象进行代理后返回。查看后续可能检测该对象的内容
普通方式
document = {
    "createElement": function(e){
        console.log("document createElement ",e);  // 通过打印确定调用内容
        if (e=="canvas") {
        // canvas是对象,先返回空对象,挂上代理,查看可能检测canvas的内容
        return getProxy({}, "canvas")
        }
    }
}
原型链
function HTMLDocument() {}
document = new HTMLDocument()

function HTMLHtmlDocument(){}
HTMLDocument.prototype.documentElement = getProxy(new HTMLHtmlDocument(), 'document.documentElement')  // 补对象后挂上代理
勾选通过代理发现调用canvas中的getContext,进行补充(对于创建和获取,日志打印较为关键)
document = {
    "createElement": function(e){
        console.log("document createElement ",e);  // 通过打印确定调用内容
        if (e=="canvas") {
        return getProxy({
            // 补充的内容
            getContext: function(e){
                console.log("canvas getContext ",e)  // 通过打印确定调用内容
            }
        }, "canvas")
        }
    }
}
代码没有异常中断后,勾选 断点(变量下面)-> Caught Exception & Uncaught Exception 。对代码自行
catch的异常进行分析,查看是否存在明显的错误需要调整。一些环境逻辑可能在通过catch处理而不异常中断如
catch到了一个属性是undefined,控制台log了 getAttribute,说明 getAttribute 为找到,需要补充。可以考虑补充到构造函数原型上。如果获取对象本身是构造函数,则补充到父类的原型上。此处给出几个典型案例// E.G. // HTMLElement.getAttribute class Element { constructor () { } getAttribute() {} } Element.prototype.custom = 'custom' // 在父类的原型上绑定 // tips:方法可以直接写在class中,属性需单独 prototype 赋值 class HTMLElement extends Element { constructor () { super() } } console.log(Element.prototype.getAttribute) console.log(HTMLElement.prototype.getAttribute) // E.G. // 检测 document.getElementByTagName('*') 输出HTMLCollection数组 // 及数组内元素的 方法 get 属性 Symbol(Symbol.iterator) 类型 symbol(补充后发现调用了_elements) // 补 _elements = [] 后 // 控制台输出 HTMLCollection{_elements:Array(0)} 中元素的属性 `(0)[]`,说明取了HTMLCollection._elements[0]。具体属性需要补对象后通过代理确定 function HTMLCollection() { this._elements=[getProxy(new Element())] // 通过代理查看 检测了 _elements[0] 的属性 TagName // 浏览器 document.getElementByTagName('*') 的第一个元素是html标签,查看其 TagName 为 HTML this._elements=[getProxy(new HTMLHtmlElement())] // 然后HTMLHtmlElement中添加tagName this.tagName = 'HTML' } HTMLDocument.prototype.getElementByTagName = function getElementByTagName(tagName) { if (tagName == '*') { // 触发 getElementByTagName('*') 检测时,返回一个HTMLCollection return getProxy(new HTMLCollection(), 'HTMLCollection_obj') } } HTMLCollection.prototype[Symbol.iterator] = function () { // prompt: 不引入库,在 function HTMLCollection() {} 基础上实现属性 Symbol(Symbol.iterator) // 异常时把代码copy并让其修改 let index = 0; const elements = this._elements; return [ next: function () { if (index < elements.length) { return {value: elements[index++], done:false} } else { return {value: undefined, done: true} } } ] } // E.G. then属性报错 -> 调用 then 的 Promise 对象。补 Promise ()。此处示例 navigator.permissions.query // 0. 先发现navigator.permissions undefined Permissions = function Permissions() {} Navigator.prototype.permissions = getProxy(new Permissions()) PermissionStatus = function PermissionStatus() // 1.3 // 1. 补完后发现寻找 navigator.permissions 中的 query ,浏览器查看 navigator.permissions.query 是函数 // 补完 query 发现 query 中没有 then,通过浏览器控制台发现 query 函数返回了 Promise 对象,then 关键字也可以印证 query 返回了 Promise 对象 Permission.prototype.query = function query() { // 1.2 Promise 不正常打印,可能是需要入参,增加参数输出 console.log('Permissions.prototype.query 参数:', arguments[0]) // 1.1 resolve 内容需要通过浏览器控制台注入确定。代码断点时状态为pending,需要跳过断点,使请求正常响应,触发回调 // navigator.permissions.query().then(res=>console.log(res) // 1.3 得到参数后修改注入代码。这里假设入参为字符串'in_params' ,navigator.permissions.query('in_params').then(res=>console.log(res) // 得到响应为 PermissionStatus 对象 return Promise.resolve(watch new PermissionStatus()) } // 浏览器控制台使用此代码测试 then ,需要释放断点,使 Promise 从 pending 状态变为结束状态,从而触发注入代码打印结果 // navigator.permissions.query({name: camera}).then(res=>console.log(res)) // E.G. 补XMLHttpRequest XMLHttpRequest = function XMLHttpRequest() {} XMLHttpRequest.prototype.open = function open(){} XMLHttpRequest.prototype.send = function send(){} XMLHttpRequest.prototype.setRequestHeader = function setRequestHeader(){} XMLHttpRequest.prototype.addEventListener = function addEventListener(){}一边补充,一边查看结果的长度。长度与加密函数长度一致时,可考虑进行下一步,函数调用
结果检测
进行加密函数调用,验证结果。结果不正确需对代理打印的undefined进行补充(看情况补充,不是所有undefined都补充,此处通常是cookie或localStorage内读取某个内容)
navigator = {};
navigator.webdriver = false;
navigator.userAgent = '...';
navigator.plateform = 'Win32';

// window.location 浏览器console直接location
location = {}

// window.localStorage
localStorage = {}
localStorage = getProxy(localStorage, "localStorage")
localStorage.getItem = function(k) {
    console.log('localStorage getItem', k)
    if (k == '') {
        return {}  // getItem获取对应值时undefined,根据if返回对应值
    }
}
自执行。加密通常为自执行,仍不成功,考虑自执行,查看是否有特殊的undefined内容进行补充 - 此处通过代理得到的代码逻辑是
document.createElement('canvas'), 然后调用了canvas.getContext("webgl"),此时的执行结果为undefined,需要补充document = { "createElement": function(e){ console.log("document createElement ",e); if (e=="canvas") { return getProxy({ getContext: function(arg) { if (arg == "webgl") { return getProxy({...}, "webgl") // 在浏览器得到webgl是第一个对象,需要补充 } } }, "canvas") } } }
toString检测
一些环境会对内置函数进行检测。以 createElement 为例,console打印的内容
document.createElement.toString()
// 浏览器环境输出: 'function createElement() { [native code] }'
// 手动补环境输出: 'function createElement() {}'
通过函数使补充内容的toString返回与浏览器一样拥有 native code 标志。一般将所有自定义函数(包括构造函数)都使用此函数进行保护 代码来源
const safeFunction = function safeFunction(func) {
    //处理安全函数
    Function.prototype.$call = Function.prototype.call;
    const $toString = Function.toString;
    const myFunction_toString_symbol = Symbol('('.concat('', ')'));

    const myToString = function myToString() {
        return typeof this === 'function' && this[myFunction_toString_symbol] || $toString.$call(this);
    }

    const set_native = function set_native(func, key, value) {
        Object.defineProperty(func, key, {
            "enumerable": false,
            "configurable": true,
            "writable": true,
            "value": value
        });
    }

    delete Function.prototype['toString'];
    set_native(Function.prototype, "toString", myToString);
    set_native(Function.prototype.toString, myFunction_toString_symbol, "function toString() { [native code] }");

    const safe_Function = function safe_Function(func) {
        set_native(func, myFunction_toString_symbol, "function" + (func.name ? " " + func.name : "") + "() { [native code] }");
    }

    return safe_Function(func)
}

// 使用示例
window.addEventListener = function addEventListener() {}
safeFunction(window.addEventListener)
// 本地node环境执行时,在后续代码处断点,控制台输入 window.addEventListener.toString() 查看是否成功加入[native code]
jsdom
优缺点: 比较全面,但开销过大,并发不高
使用
// 导入
const jsdom = require('jsdom')
const {JSDOM} = jsdom
// 新建节点
const dom = new JSDOM(
    // 标签 - 此处可直接编写 <script>,内部包含目标js
    `<html></html>`,
    // 配置项
    {
        url: '',
        referer: '',
        contentType: '',
        userAgent: '',
        includeNodeLocations: true,
        runScripts: 'dangerously'  // 允许运行脚本
    }
)
// window对象
console.log(dom.window)

// 加载目标js
const fs = require('fs')
const jscode = fs.readFileSync('./sign.js', 'utf-8');
const dom1 = new JSDOM(
    '<script>' + jscode + '</script>',
    {
        url: '',
        referer: '',
        contentType: '',
        userAgent: '',
        includeNodeLocations: true,
        runScripts: 'dangerously'  // 允许运行脚本
    }
)

// jsdom 会保持运行,需手动关闭
dom.window.close()
dom1.window.close()
配置项
runScripts由于js可能会读取设备信息,默认不会执行dom中的js代码。需设置为'dangerously'从而执行js代码beforeParse钩子函数,在执行前注入内容beforeParse(window) { // 注入变量 window.salt = 1234567 // hook 函数 window.JSON._stringify = window.JSON.stringify window.JSON.stringify = function(p){console.log(p); return window.JSON._stringify(p)} window.stringify.toString = function(){return 'ƒ stringify() { [native code] }'} }cookieJar提前设置cookie// 新建cookie对象 cookie = new jsdom.CookieJar() // 在对象中放入 cookie 内容(cookie内容,cookie url,空方法) cookie.setCookie(content, url, function (p) {}) // 在配置项中 { cookieJar: cookie }